 Emulating the Gigatron TTL in MAME
8/6/2020
The Concept
Basically, I made this driver because I wanted to learn how one of my favorite emulators worked. Plus, MAME hasn't really had a machine like this before, so I figured I'd give it a shot. It was also a good programming exercise for me. The Gigatron is a relatively simple machine, every hardware aspect is controlled by the "CPU", the screen, sound, blinkenlights, everything.
The Gigatron has no CPU, it's all 7400-series TTL logic chips, but those specific chips allow for an instruction set with 256 unique instructions, with a few registers that are able to control the video signal, the sound, and blinkenlights. In fact, the most difficult thing about it would be learning MAME's framework.
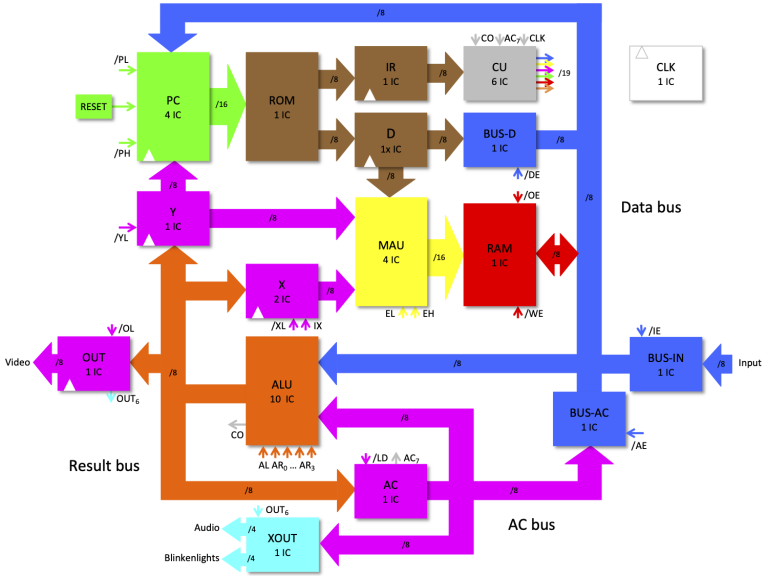
This block diagram shows how everything in the machine is connected together.
Phil Thomas' Emulator
Turns out, there was already a JS-based emulator on the official website, made by Phil Thomas. That emulator uses a BSD-2-clause license, which is compatible with MAME's BSD-3-clause license, so it wouldn't be of much concern if I ported that emulator to MAME.
CPU
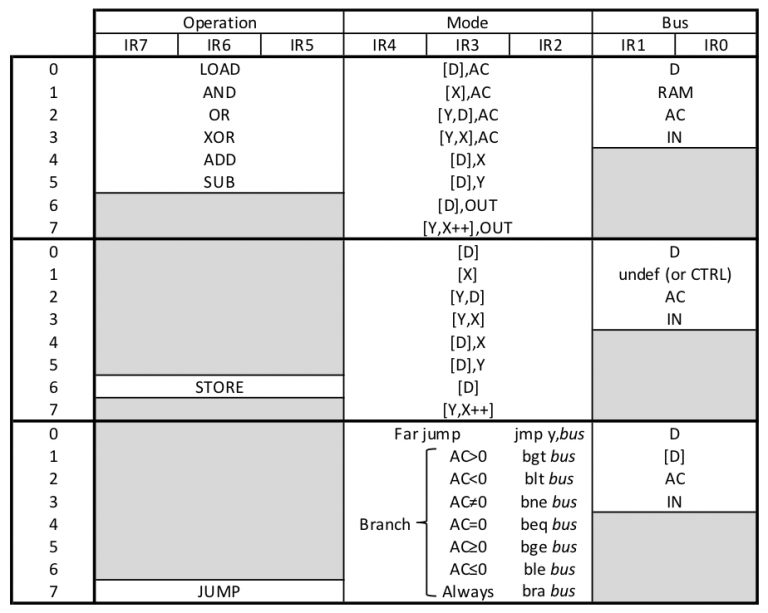
This diagram can show just how simple the Gigatron CPU is. There are so few instructions, and each instruction takes 1 cycle, out of 6.25 MHz. Of course, not all ofstyle="width:720px" that is for program code. A good few hundred thousand cycles or so is used to draw the frame to the screen, some are used to control the blinkenlights, and some are used for audio.
Audio

Audio on the Gigatron is incredibly simple. It uses a 4-bit R-2R DAC, using a few resistors to do the digital to analog conversion. The biggest challenge of it was figuring out the way I can attach and control a DAC in MAME. Thankfully, it's not too difficult to do that! I just had to use this bit of code in the machine configuration:

The first line attaches a speaker, with audio playing at equal volumes in both the left and right ears. The second line attaches a 4-Bit R-2R DAC, and routes it to the speaker. Lines 3-5 simply attach a voltage regulator and route that to the DAC, though I still have yet to figure out what the point of the voltage regulator is.
Here's the code that is responsible for controlling the DAC:

And port_outx() is tied to the outx register of the CPU through this simple line in the machine configuration:

As you can see, the upper 4 bits of register outx are responsible for controlling what sound sample is currently playing. The lower 4 bits are for controlling the LEDs on the machine.

These blinkenlights are controlled through software, not hardware. If you were to use TinyBASIC (you cannot yet in MAME), you would be able to control these lights.
Video

The Gigatron is capable of displaying 6-bit color on the VGA screen, with a maximum of 64 colors. As you can see in the above image, register out is responsible for generating the video signal.
We can attach a screen to the machine using these few lines in the machine configuration:

These set the screen size to 640x480 with a refresh rate of 59.98Hz. It also points at what the emulator should to to update the screen.

This is the code that is responsible for taking the value of register "out", and drawing pixels with it. It detects all the standard VBlank and HBlank stuff, you know, resetting the position of the beam, stuff like that. Towards the bottom, you can see where it draws the pixels. It grabs the necessary color values out of the R, G, and B bits of the OUT register and converts them to a single 24-bit value that can be displayed on any modern display. Simple.
We let the machine know how to use port_out by using this simple line in the configuration:

Input

The Gigatron handles input through a DB-9 joystick port, used in several older consoles and home computers such as the Sega Genesis, Commodore Amiga, and Atari 2600. The machine ships with a Nintendo Famicom-like controller, so we just need to emulate the buttons on the controller. This code can do that:

But there's more that we have to do to attach the keypad. So, we add this line to our machine configuration:

This will attach the value that the keypad reads to the register called inReg. This is what allows the CPU to read the joystick state.
Memory
Attaching memory maps was easy. I had to define them like this:

And then let the CPU know which is ROM and which is RAM.

Conclusion
So that's a relatively basic explanation of how I ported Gigatron.js to MAME!
Not everything has to be cutting-edge to be fun! 
Greetz
TheMogMiner, Osso13 and ajrhacker for some programming help
Phil Thomas for his JS-Based emulator
Marcel van Kervinck (RIP) / Walter Belgers for creating such a fun little machine
Gigatron website
Phil's emulator
My Gigatron driver
My Gigatron CPU code